
Updated for v0.1.3, this guide follows the current production paths in the repository: Next.js 16 App Router, Better Auth, Stripe billing, PostgreSQL with Drizzle, Cloudflare R2 uploads, localized marketing pages, API keys, and browser-approved CLI device authentication. Use it as an implementation map, then verify every change with the repository's own lint, type-check, test, and build commands.
1. Project Overview
1.1. Project Introduction
UllrAI SaaS Starter Kit is a free, open-source, production-ready full-stack SaaS starter kit. It integrates the most respected technologies and practices in modern web development, designed to help developers launch their next SaaS project at unprecedented speed, allowing you to focus on business logic rather than infrastructure setup.
- Core Features: Provides authentication, payment subscriptions, database management, file uploads, content management, and other core SaaS application features.
- Agent-Friendly Positioning: Built for browser users, APIs, local automation, and agent (OpenClaw, Codex, Claude Code, etc.) workflows from the same codebase.
- Technology Stack: Based on Next.js 16 App Router, TypeScript, PostgreSQL, Drizzle ORM, and integrates Stripe payments, Resend email service, and Cloudflare R2 file storage.
- Use Cases:
- Quickly build full-stack SaaS applications requiring user login and paid subscription features.
- As a practical project for learning modern full-stack web development technologies.
- Provide a stable, scalable initial scaffold for enterprise-level projects.
- Independent developers or small teams quickly validate business ideas.
1.2. Quick Start
1.Clone the project
git clone https://github.com/ullrai/saas-starter.git
cd saas-starter
2.Install dependencies
pnpm install
3.Configure environment
Copy .env.example to .env and fill in all required environment variables.
cp .env.example .env
4.Sync database Make sure your local PostgreSQL database is running, then execute:
pnpm db:push
5.Run development server
pnpm dev
The application will run at http://localhost:3000.
1.3. Feature List
- Modern Framework: Next.js 16 (App Router, RSC), React 19, TypeScript
- UI: Tailwind CSS v4, shadcn/ui, Lucide Icons, Dark/Light Mode
- Authentication: Better-Auth (Magic Link, OAuth - Google/GitHub/LinkedIn)
- Machine Auth: API keys, browser-approved CLI device login, CLI session review, versioned
/api/v1/*endpoints - Database: PostgreSQL + Drizzle ORM (Type-safe queries, Migration management)
- Payment Subscriptions: Stripe integration (One-time payments, Subscriptions, Customer portal, Webhooks)
- File Upload: Cloudflare R2 integration (Client-side presigned direct upload, Server-side proxy upload, Image compression)
- Content Management: Content Collections (Markdown blog system)
- Email Service: Resend + React Email (Transactional email templates)
- Form Handling: React Hook Form + Zod (Type-safe form validation)
- Code Quality: ESLint, Prettier, Jest, Playwright smoke tests
- Admin Dashboard: Generic data management dashboard, easily extensible to manage any database table
- Agent-Friendly Workflow: First-party
saas-cli, API verification, and management surfaces for authorized devices - Deployment: Zeabur reference deployment and standalone Docker image
1.4. Technical Architecture Diagram

graph TD
    subgraph "Frontend (Browser)"
        A[User] --> B{Next.js App};
    end

    subgraph "Zeabur Service"
        B -- React Server Components --> C["UI (shadcn/ui, Tailwind)"];
        B -- API Routes/Server Actions --> D[Backend Logic];
    end

    subgraph "Core Services"
        D -- ORM --> E[Drizzle ORM];
        E --> F[(PostgreSQL)];
        D -- Auth API --> G[Better-Auth];
        D -- Payment API --> H[Stripe];
        D -- Email API --> I[Resend];
        D -- Storage API --> J[Cloudflare R2];
    end

    subgraph "Content Management"
        K[Content Collections] -- Indexes --> L[Markdown/JSON in Git];
        B -- Reads data --> L;
    end

    G -- OAuth --> M[Google/GitHub/LinkedIn];
    H -- Webhooks --> D;

    style A fill:#f9f,stroke:#333,stroke-width:2px;
    style F fill:#add,stroke:#333,stroke-width:2px;
    style J fill:#f90,stroke:#333,stroke-width:2px;
    style H fill:#f66,stroke:#333,stroke-width:2px;
    style I fill:#9cf,stroke:#333,stroke-width:2px;
2. In-Depth Technical Analysis
2.1. Directory Structure Breakdown
SaaS-Starter-main/
├── src/                  # All application source code
│   ├── app/              # Next.js App Router core directory
│   │   ├── (auth)/       # Authentication-related pages (login, signup)
│   │   ├── (dashboard)/  # Protected dashboard pages
│   │   ├── (pages)/      # Public pages (home, about, blog, etc.)
│   │   ├── api/          # API routes
│   │   ├── layout.tsx    # Root layout
│   │   └── not-found.tsx # Global 404 page
│   ├── components/       # React components
│   │   ├── admin/        # Admin dashboard components
│   │   ├── auth/         # Authentication flow components
│   │   ├── blog/         # Blog-related components
│   │   ├── forms/        # Form components
│   │   ├── homepage/     # Homepage-specific components
│   │   └── ui/           # Generic UI components (based on shadcn/ui)
│   ├── database/         # Drizzle ORM related
│   │   ├── migrations/   # Database migration files
│   │   ├── config.ts     # Shared migration config
│   │   ├── index.ts      # Drizzle client initialization
│   │   └── schema.ts     # Database table structure definitions
│   ├── emails/           # React Email templates
│   ├── hooks/            # Custom React Hooks
│   ├── lib/              # Core logic and utility functions
│   │   ├── actions/      # Next.js Server Actions
│   │   ├── admin/        # Admin dashboard core logic
│   │   ├── auth/         # Authentication config and logic (Better-Auth)
│   │   ├── billing/      # Payment abstraction layer and providers (Stripe)
│   │   ├── config/       # Global constants, products, roles, etc.
│   │   ├── database/     # Database helper functions
│   │   ├── email.tsx     # Email sending service
│   │   └── r2.ts         # Cloudflare R2 file upload service
│   ├── schemas/          # Zod validation schemas
│   └── types/            # TypeScript type definitions
├── content/              # Repository-managed content (Markdown, JSON)
├── public/               # Static assets
├── scripts/              # Helper scripts (like setting up admin)
└── styles/               # Global styles and CSS
2.2. Core Module Analysis
2.2.1. Entry Files and Startup Flow
src/app/layout.tsx: The project's root layout that wraps all pages. It handles:- Setting HTML
langattribute and font variables. - Integrating
ThemeProviderfor dark/light mode. - Integrating
NextTopLoaderfor page loading progress. - Integrating
Toasterfor global notifications. - Providing the request locale and next-intl messages to the application.
- Setting HTML
proxy.ts: Runs before requests reach pages, core for route protection.- Checks user session cookies.
- Redirects to
/loginif user is not logged in but accessing/dashboard/*. - Canonicalizes locale-prefixed marketing URLs and forwards the active locale.
src/app/dashboard/layout.tsx: Root layout for the dashboard.- Enforces authentication on the server with
requireAuthbefore rendering protected content. - Renders
AppSidebarand main content areaSidebarInset.
- Enforces authentication on the server with
2.2.2. Configuration System Design
The project's configuration is highly centralized for easy maintenance and extension.
- Environment Variables (
env.js): Uses@t3-oss/env-nextjsto enforce environment variable validation. All environment variables (like API keys and database URLs) are defined in.envand accessed throughenv.jsfor type safety. This prevents runtime errors due to missing environment variables. - Application Constants (
src/lib/config/constants.ts): Stores app name, description, contact email, and other hardcoded values that don't change frequently. - Product Plans (
src/lib/config/products.ts): Centrally defines internal tiers and prices. Stripe test and live Price IDs are isolated insrc/lib/billing/stripe/prices.tsand generated by the catalog sync command. - User Roles (
src/lib/config/roles.ts): Defines user roles and their hierarchical relationships (user,admin,super_admin). Helper functions likehasRoleprovide unified permission checking logic. - File Upload (
src/lib/config/upload.ts): Centrally manages all file upload rules, including maximum file size, allowed file types, etc. All upload paths (client and server-side) share this configuration, ensuring rule consistency.
2.2.3. Machine Auth and Agent Workflow
- Web users: Continue to use Better Auth sessions and dashboard route protection.
- Machine clients: Use versioned
/api/v1/*endpoints and bearer tokens instead of browser cookies. - API keys: Created and revoked inside the dedicated Developer Access page for scripts, integrations, and agents.
- CLI device auth:
saas-clistarts a browser-approved device flow so local tools can sign in without copying browser session tokens. - Session review: Authorized CLI sessions can be reviewed and revoked from the dedicated Developer Access page.
2.2.4. Routing Architecture
The project uses Next.js App Router and leverages Route Groups for logical page separation.
(pages): Contains all public pages like home, about, blog, pricing, etc. Usessrc/app/(pages)/layout.tsxto provide unified header and footer.(auth): Contains authentication flow pages like login, signup. Usessrc/app/(auth)/layout.tsxto provide a centered, clean layout.dashboard: Contains all pages requiring user login. Its layout enforces server-side route protection withrequireAuth.api/v1: Contains versioned machine-facing auth endpoints for API verification, device approval, token exchange, and refresh.
2.2.5. Build and Packaging Process
next.config.ts: Next.js core configuration file.- Configures
images.remotePatternsto allow loading images from Unsplash and Cloudflare R2. - Integrates
@next/bundle-analyzer. WhenANALYZEenvironment variable is set totrue, runningpnpm analyzegenerates and opens bundle size analysis report after build, helping developers optimize frontend resource size.
- Configures
package.json:dev: Starts development server with Next.js 16's--turbomode for faster local compilation.build: Builds production application.start: Starts production server.
3. Development Guide
3.1. Environment Setup
- Install Tools:
- Node.js v20.x or higher.
- pnpm (
npm install -g pnpm). - PostgreSQL database (recommended using Docker:
docker run --name my-postgres -e POSTGRES_PASSWORD=mysecretpassword -p 5432:5432 -d postgres).
- Clone and Install:
git clone https://github.com/ullrai/saas-starter.git cd saas-starter pnpm install - Configure Environment Variables:
- Copy
.env.exampleto.env. - Generate a secure
BETTER_AUTH_SECRET:openssl rand -base64 32. - Fill in your PostgreSQL
DATABASE_URL. - Configure a Stripe secret key and webhook endpoint secret, plus credentials for Resend and Cloudflare R2, in
.env.
- Copy
- Database Setup:
- Development:
pnpm db:pushsynchronizes changes fromdatabase/schema.tsdirectly to the database, suitable for rapid iteration. - Shared environments: generate and commit SQL migrations with
pnpm db:generate, deploy the code, then runpnpm db:migrateonce against the targetDATABASE_URL.
- Development:
3.2. Development Workflow
- Start Development Server:
pnpm dev - Test agent-friendly auth locally:
pnpm saas-cli -- auth login --base-url http://localhost:3000pnpm saas-cli -- auth status --base-url http://localhost:3000- Or export
SAAS_CLI_API_KEY=ssk_...for scripts and agent calls
- Modify Database:
- Edit
database/schema.ts. - Run
pnpm db:pushto sync changes.
- Edit
- Create New Pages:
- Create marketing routes in
src/app/(pages)and protected routes insrc/app/dashboard.
- Create marketing routes in
- Create API Routes:
- Create new folders and
route.tsfiles in theapp/apidirectory.
- Create new folders and
- Create Server Actions:
- Create new files in the
lib/actionsdirectory using the"use server";directive.
- Create new files in the
- Code Checking:
- Run
pnpm lintto check code style. - Run
pnpm prettier:formatto format code.
- Run
3.3. Code Standards
- Naming Conventions:
- Components use PascalCase, e.g.,
FileUploader. - Functions and variables use camelCase.
- Constants use UPPER_SNAKE_CASE.
- Components use PascalCase, e.g.,
- File Organization:
- Page components are placed in their respective
approute folders, usually in_componentssubdirectories. - Reusable components are placed in the
componentsdirectory. - Logic, types, configurations are separated into
lib,types,schemasdirectories.
- Page components are placed in their respective
- Comment Requirements:
- Use JSDoc comments for complex functions or logic blocks.
- Use inline comments for non-intuitive code.
4. Feature Module Details
4.1. Authentication System (Better-Auth)
This starter kit uses the better-auth library to provide a complete authentication solution.
-
Core Configuration:
src/lib/auth/server.ts- Configures Drizzle database adapter.
- Dynamically loads social login providers (Google, GitHub, LinkedIn), only enabled when corresponding
CLIENT_IDandSECRETare provided in.env. - Integrates
magicLinkplugin and configures using Resend for email sending.
-
API Route:
app/api/auth/[...all]/route.ts- This is a dynamic route that captures all
better-authauthentication requests (like/api/auth/magic-link,/api/auth/google/login, etc.) and hands them toauth.handler.
- This is a dynamic route that captures all
-
Client:
src/lib/auth/client.ts- Provides methods for interacting with the authentication system in client components, like
signIn,signOut,useSession, etc.
- Provides methods for interacting with the authentication system in client components, like
-
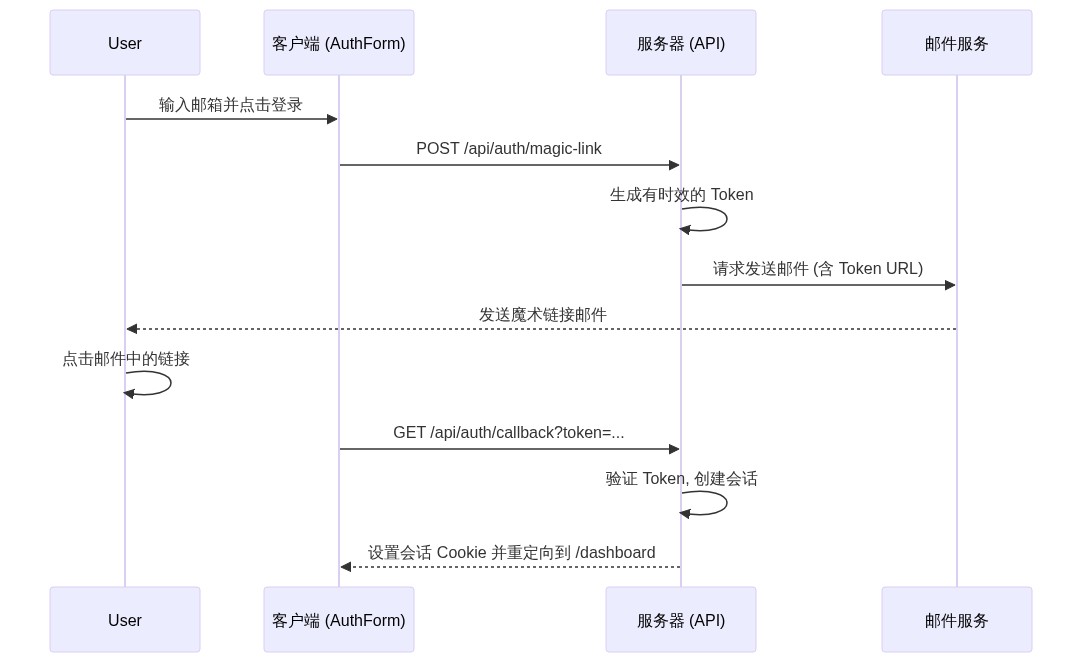
Authentication Flow (Magic Link):
sequenceDiagram
    participant User
    participant Client as Frontend (AuthForm)
    participant Server as Server (API)
    participant Resend as Email Service

    User->>Client: Enter email and click login
    Client->>Server: POST /api/auth/magic-link
    Server->>Server: Generate time-limited Token
    Server->>Resend: Request to send email (with Token URL)
    Resend-->>User: Send magic link email
    User->>User: Click link in email
    Client->>Server: GET /api/auth/callback?token=...
    Server->>Server: Verify Token, create session
    Server-->>Client: Set session Cookie and redirect to /dashboard
4.2. Database & ORM (Drizzle)
- Schema Definition:
database/schema.tsis the single source of truth for all database tables, defining table structures, relationships, and constraints using Drizzle ORM syntax. - Client Initialization:
database/index.tsinitializes the Drizzle client and applies different connection pool configurations based on environment (Serverless or traditional server) (src/lib/database/connection.ts). - Migration Management:
- The project maintains a single committed migration history in
src/database/migrations. pnpm db:generate: Generate SQL migration files based on changes inschema.ts.pnpm db:push: Development only, directly syncs schema to database, loses history.pnpm db:migrate: Apply committed migration files to the database selected byDATABASE_URL.
- The project maintains a single committed migration history in
4.3. Payment & Subscriptions (Stripe)
-
Abstraction Layer:
src/lib/billing/index.tsexports a unifiedbillingobject so routes and actions stay independent from Stripe API details. -
Provider Implementation:
src/lib/billing/stripe/provider.tsis the specific implementation for Stripe payment provider, encapsulating logic for creating checkout sessions, customer portals, and handling webhooks. -
API Interfaces:
/api/billing/checkout: Creates payment sessions. Returns409 Conflictstatus and management link when user tries to purchase existing subscription./api/billing/portal: Creates a URL to Stripe customer portal where users can manage their subscriptions./api/billing/webhooks/stripe: Receives webhook events from Stripe for updating subscription status, recording payments, etc.
-
Webhook Handling:
src/lib/billing/stripe/webhook.ts- Security: Uses Stripe's official SDK to verify the raw request body and
Stripe-Signatureheader before processing any event. - Idempotency: Records processed event IDs in
webhook_eventstable to prevent duplicate processing of the same event. - Transactional: All database operations are completed in one transaction, ensuring data consistency.
- Security: Uses Stripe's official SDK to verify the raw request body and
-
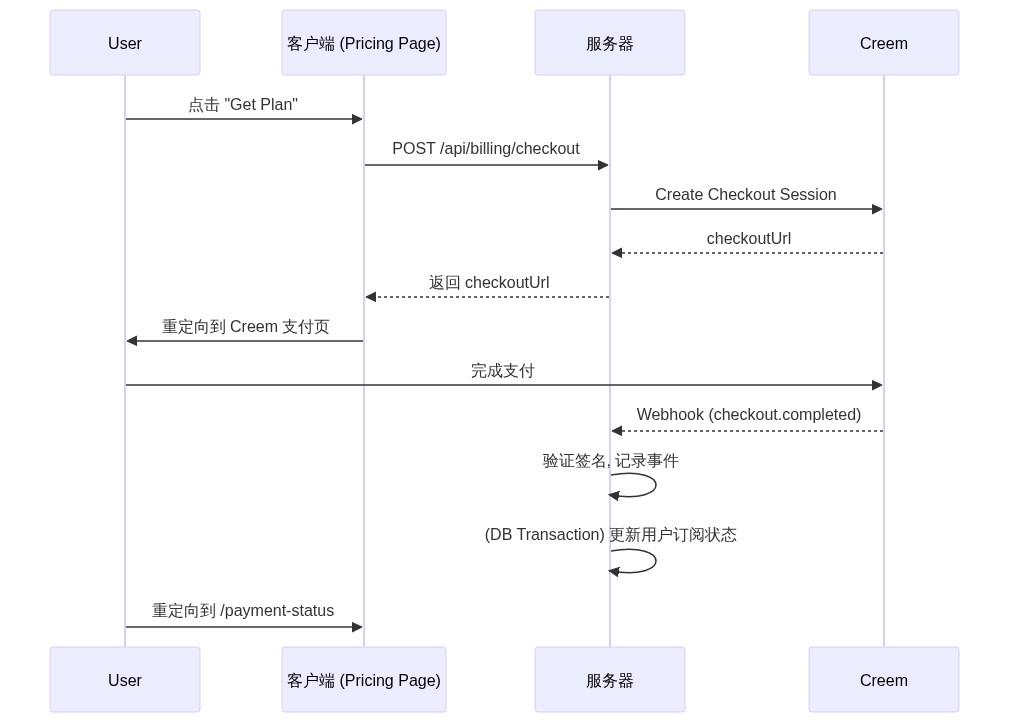
Payment Flow:
sequenceDiagram
    participant User
    participant Client as Frontend (Pricing Page)
    participant Server as Server
    participant Stripe

    User->>Client: Click "Get Plan"
    Client->>Server: POST /api/billing/checkout
    Server->>Stripe: Create Checkout Session
    Stripe-->>Server: checkoutUrl
    Server-->>Client: Return checkoutUrl
    Client->>User: Redirect to Stripe payment page
    User->>Stripe: Complete payment
    Stripe-->>Server: Webhook (checkout.session.completed)
    Server->>Server: Verify signature, record event
    Server->>Server: (DB Transaction) Update user subscription status
    User->>Client: Redirect to /payment-status
4.4. File Upload (Cloudflare R2)
The system supports two upload modes, providing optimal choices for different scenarios. All upload rules are centralized in src/lib/config/upload.ts.
4.4.1. Client-side Presigned Upload (UI Recommended)
This is the default method used by the FileUploader component, offering better performance.
Flow Diagram:
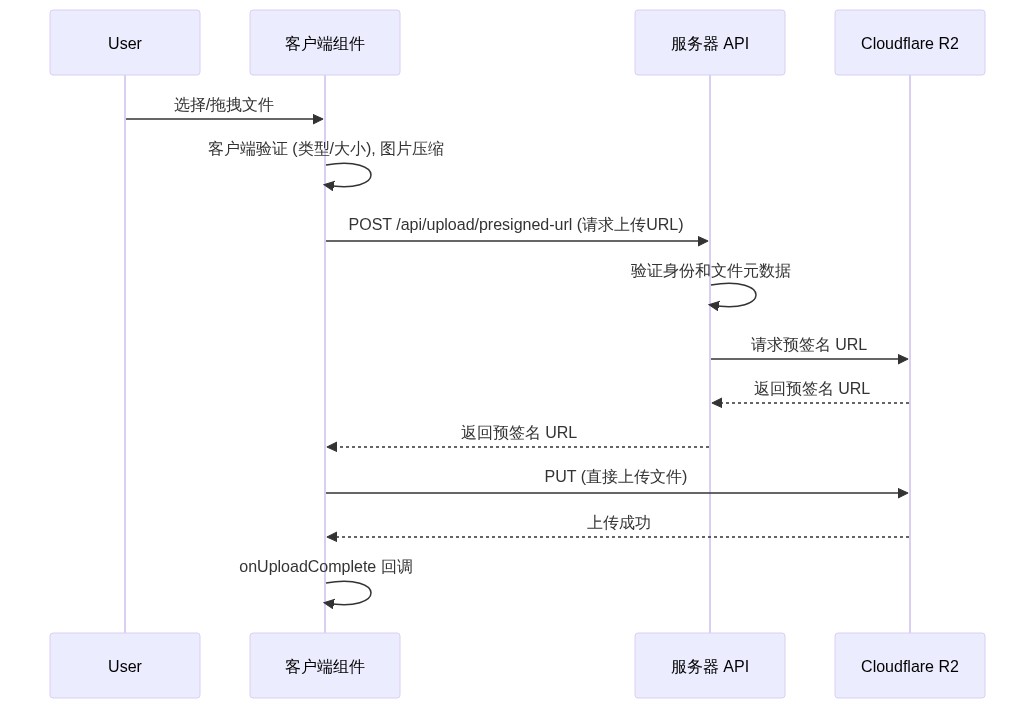
sequenceDiagram
    participant User
    participant FileUploader as Frontend Component
    participant Server as Server API
    participant R2 as Cloudflare R2

    User->>FileUploader: Select/drag files
    FileUploader->>FileUploader: Client-side validation (type/size), image compression
    FileUploader->>Server: POST /api/upload/presigned-url (request upload URL)
    Server->>Server: Verify identity and file metadata
    Server->>R2: Request presigned URL
    R2-->>Server: Return presigned URL
    Server-->>FileUploader: Return presigned URL
    FileUploader->>R2: PUT (direct file upload)
    R2-->>FileUploader: Upload success
    FileUploader->>FileUploader: onUploadComplete callback
4.4.2. Server-side Proxy Upload
This mode allows server-side processing before storage.
Flow Diagram:
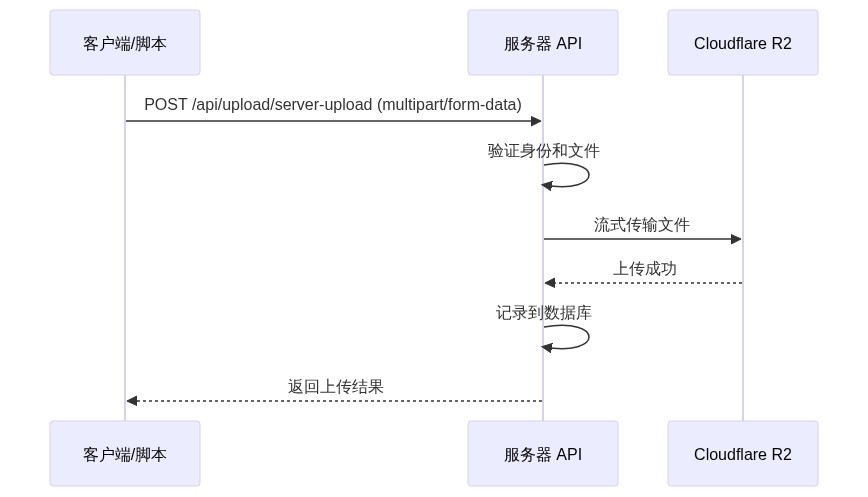
sequenceDiagram
    participant Client as Client/Script
    participant Server as Server API
    participant R2 as Cloudflare R2

    Client->>Server: POST /api/upload/server-upload (multipart/form-data)
    Server->>Server: Verify identity and file
    Server->>R2: Stream file
    R2-->>Server: Upload success
    Server->>Server: Record to database
    Server-->>Client: Return upload result
4.5. Blog & Content Management (Content Collections)
- Content Pipeline: Uses
Content Collectionsto index repository-managed Markdown and JSON content under thecontent/directory. - Authoring Workflow: Blog posts are edited directly in
content/blog/*.md, while author data lives incontent/authors/*.json. - Content Reading:
content-collections.tsdefines the content schema and generated collections.src/app/(pages)/blog/page.tsx: Blog list page, reads all indexed articles.src/app/(pages)/blog/[slug]/page.tsx: Blog detail page, reads a single article and renders Markdown withreact-markdown.
4.6. Admin Dashboard
Provides a powerful, extensible data management system.
- Modular management pages: Includes dedicated admin pages for users, payments, subscriptions, and uploads to keep each business domain isolated.
- Unified permission guard: All admin operations are protected by admin-level authorization checks.
- Server Actions: Management reads/writes are handled by type-safe Server Actions in
src/lib/actions/admin.ts, without adding extra API routes.
5. Secondary Development Guide
5.1. Extension Point Identification
- Add New Pages: Create new routes in
src/app/(pages)orsrc/app/dashboard. - Add New Admin Management Tables:
- Define new table in
database/schema.ts. - Add corresponding query/mutation logic in
src/lib/actions/admin.ts. - Create a dedicated management page under
src/app/dashboard/admin/and add its navigation insrc/app/dashboard/_components/app-sidebar.tsx.
- Define new table in
- Add New Payment Provider:
- Create new provider implementation file under
src/lib/billing/, must followPaymentProviderinterface insrc/lib/billing/provider.ts. - Modify
PAYMENT_PROVIDERlogic insrc/lib/billing/index.tsto switch to new provider.
- Create new provider implementation file under
- Customize Email Templates: Create or modify React Email components in
src/emails/directory. - Customize UI Components: Modify
shadcn/uicomponents or add new ones insrc/components/ui/.
5.2. API Reference
| Route | Method | Description |
|---|---|---|
/api/auth/[...all] | GET, POST | Handle all better-auth authentication requests. |
/api/billing/checkout | POST | Create payment session. |
/api/billing/portal | GET | Get customer portal URL. |
/api/billing/webhooks/stripe | POST | Receive Stripe webhook events. |
/api/upload/presigned-url | POST | Get presigned URL for client-side direct upload. |
/api/upload/server-upload | POST | Server-side proxy file upload. |
/api/payment-status | GET | Query payment status. |
5.3. Hooks and Events
useSidebar(): Used in dashboard components to control sidebar expand/collapse state.useIsMobile(): Client-side hook to determine if current device is mobile size, safe for responsive components, avoiding SSR hydration errors.useAdminTable(): Core hook for driving admin dashboard table components. Encapsulates data fetching, pagination, search, filtering, and loading state management logic.onUploadComplete: Callback prop forFileUploadercomponent, triggered after successful file upload.
6. Developer Toolchain
6.1. Testing Strategy
- Frameworks: Uses
Jest,React Testing Library, andPlaywright. - Configuration Files:
jest.config.js,jest.setup.ts,playwright.config.ts. - Unit and integration coverage: Jest covers UI components, route handlers, hooks, auth helpers, billing helpers, upload logic, and dashboard pages.
- Browser smoke coverage: Playwright currently exercises dashboard auth redirects, authenticated dashboard access, admin gating, and locale canonicalization in a real browser.
- Examples:
- Unit/component:
src/components/forms/auth-form.test.tsx - Page:
src/app/dashboard/page.test.tsx - Route handler:
src/app/api/billing/checkout/route.test.ts - Browser E2E:
e2e/auth.spec.ts,e2e/admin.spec.ts,e2e/locale.spec.ts
- Unit/component:
- Run Tests:
pnpm testpnpm test:e2e
- Test-only session route: Playwright enables
/api/test/sessiononly whenE2E_TEST_MODE=trueand an explicitE2E_TEST_SECRETof at least 32 characters is present. The route is disabled for non-local production deployments and signs the test cookie with that secret.
6.2. Code Quality Assurance
- ESLint: Configured in
.eslintrc.json, followseslint-config-nextbest practices. - Prettier: Integrated with ESLint, uses
prettier-plugin-tailwindcssto auto-sort Tailwind CSS classes. - Run Checks:
pnpm lintandpnpm prettier:check. - Auto Format:
pnpm prettier:format.
6.3. Bundle Size Analysis
- Uses
@next/bundle-analyzerto analyze production build bundle size. - Run
pnpm analyzeto generate client and server analysis reports. - This is crucial for identifying and optimizing large dependencies.
7. Real-world Application Scenarios
7.1. Typical Use Cases
- Enterprise SaaS: As starting point for new projects, integrates user management, role permissions, payments, and audit logs (through webhook events) needed by enterprises.
- AI Applications: Quickly build AI tools requiring user login and usage/subscription-based payments. File upload functionality can be used for processing user data.
- Paid Content Platforms: Blog and content management system combined with payment functionality can easily be extended to paid content platforms.
- Internal Tools: Leverage powerful admin dashboard and data management capabilities to quickly build company internal data management tools or dashboards.
8. Utility Tools
8.1. CLI Commands
| Script | Description |
|---|---|
pnpm dev | Start development server (Turbo mode) |
pnpm content:build | Generate Content Collections output |
pnpm build | Build production application |
pnpm start | Start production server |
pnpm lint | Run ESLint checks |
pnpm test | Run Jest unit tests |
pnpm test:e2e | Run Playwright E2E smoke tests |
pnpm prettier:format | Format all code |
pnpm db:generate | Generate committed migration files |
pnpm db:migrate | Apply migrations to the current database |
pnpm db:push | (Development only) Push schema to database |
pnpm analyze | Build and analyze bundle size |
pnpm set:admin | Promote user to super admin |
8.2. Configuration Options
All required and optional environment variables are detailed in the environment configuration section of README.md. Be sure to completely fill out the .env file.
8.3. Utility Functions
src/lib/utils.ts provides some useful utility functions:
cn(...inputs): Safely merge Tailwind CSS class names and resolve conflicts.formatCurrency(amount, currency): Format amounts in cents to currency strings.calculateReadingTime(text): Calculate estimated reading time based on text content.
9. Version Management & Updates
9.1. Dependency Management
- Package Manager: Project uses
pnpm, ensure you have it installed globally.pnpmleverages content-addressable storage to save disk space and speed up installations. - Version Locking:
pnpm-lock.yamlfile locks exact versions of all dependencies and their sub-dependencies, ensuring consistency across team members and different deployment environments. - Dependency Updates: Recommend using
pnpm up --latestto safely update dependencies, and pay attention to major version change logs.
10. Best Practices
10.1. Performance Optimization
- Code Splitting: Use
next/dynamicfor dynamic imports of large components, like dynamic imports for each settings page insrc/app/dashboard/settings/_components/settings.tsx. - Image Optimization: Prioritize using Next.js
<Image>component, which automatically performs image size optimization, format conversion (like WebP), and lazy loading. - Server Components: Use React Server Components (RSC) as much as possible for data fetching and logic execution, reducing JavaScript code sent to client.
- Database Queries: Avoid executing database queries in loops. Leverage Drizzle ORM's join and batch operation capabilities to reduce database round trips.
10.2. Security Considerations
- Environment Variables: Never commit
.envfiles to Git. Store production values in Zeabur's service variables or an equivalent secret manager. - Route Protection:
proxy.tsis the first line of defense, but must use functions likerequireAuth,requireAdminin Server Actions and API routes for backend permission verification. - SQL Injection: Using Drizzle ORM effectively prevents SQL injection attacks because it automatically parameterizes queries.
- XSS: Next.js and React escape JSX content by default, preventing cross-site scripting attacks. When handling user-generated content, use mature libraries (like
DOMPurify) for sanitization. - Webhook Security: Signature verification in
src/lib/billing/stripe/webhook.tsis key to ensuring webhook requests come from trusted sources.
10.3. Deployment Guide
The production reference deployment uses Zeabur.
Save 10% on a Zeabur server: Purchase a server at Zeabur and enter referral code
visoarat checkout.
Configure Zeabur to deploy the prod branch, not direct pushes to the default
development branch (main in this repository). A release/* tag promotes its
commit to prod only when that commit belongs to the default branch.
- Merge a reviewed commit into the default branch and wait for CI.
- Configure the required service variables from
.env.example. - Run
pnpm db:migrateonce against the productionDATABASE_URL. - Push an annotated
release/*tag on that commit. - Wait for the promotion workflow and the subsequent Zeabur deployment.
- Use
/api/readyfor database-backed readiness and inspect build and runtime logs. - Verify both locale URL variants, authentication redirects, and an authenticated Dashboard session.
11. Community & Ecosystem
Before deploying, compare the Next.js 16 architecture guide, the Stripe billing production guide, and the API key, OAuth, and device-flow guide. Then inspect the feature boundaries, review pricing behavior, and clone the GitHub source instead of copying isolated snippets out of context.
11.1. Community Resources
- Official Repository: UllrAI SaaS Starter on GitHub
- Issues & Discussions: Use GitHub Issues to submit bug reports and feature requests.
- Main Dependency Documentation:
11.2. Contribution Guidelines
We welcome community contributions!
- Fork this project repository.
- Create a new branch (
git checkout -b feature/your-feature-name). - Make changes and commit (
git commit -m 'feat: Add some feature'). - Push your branch to forked repository (
git push origin feature/your-feature-name). - Create a Pull Request.
12. Troubleshooting
12.1. Common Issues FAQ
Q: How do I add or update blog content?
A: Add or edit Markdown files in content/blog/ and update author JSON in content/authors/ when needed. Run pnpm content:build if you want to regenerate the typed content output manually before testing or building.
Q: File upload fails with CORS error.
A: This is the most common file upload issue. Make sure you have correctly configured CORS policy in your Cloudflare R2 bucket settings, allowing PUT and GET requests from your deployment domain and http://localhost:3000.
Q: How to set up the first admin account?
A: The system doesn't automatically set up admins. You need to:
- First register an account normally in the app with the email you want to make admin.
- Run
pnpm set:admin [email protected]in your project root directory. The command loads.envwhen present and otherwise uses the current process environment.
Q: Social login doesn't work, what to do?
A: Please check the following:
- Make sure you correctly filled in the corresponding social platform's
CLIENT_IDandCLIENT_SECRETin the.envfile. - Make sure in the social platform's OAuth app configuration (like Google Cloud Console, GitHub Developer Settings), you've added
http://localhost:3000/api/auth/[provider]/callbackand your production domain's callback URL to the authorized callback URL list.